Execution
Execution
Lesson 25 : Stop Losses
Lesson 25 : Stop Losses
Lesson 25 : Stop Losses
Beginner
Beginner
3 min
3 min
Stop Losses
Stop Losses
Stop Losses
Stop losses are essential both to protect the trading account and to remain in a trade until the chart invalidates the trade idea. They should be placed at protected swings, as this is where trade setups are considered invalidated. There are two types of stop loss placements: swing invalidation and body invalidation.
Stop losses are essential both to protect the trading account and to remain in a trade until the chart invalidates the trade idea. They should be placed at protected swings, as this is where trade setups are considered invalidated. There are two types of stop loss placements: swing invalidation and body invalidation.
Stop losses are essential both to protect the trading account and to remain in a trade until the chart invalidates the trade idea. They should be placed at protected swings, as this is where trade setups are considered invalidated. There are two types of stop loss placements: swing invalidation and body invalidation.
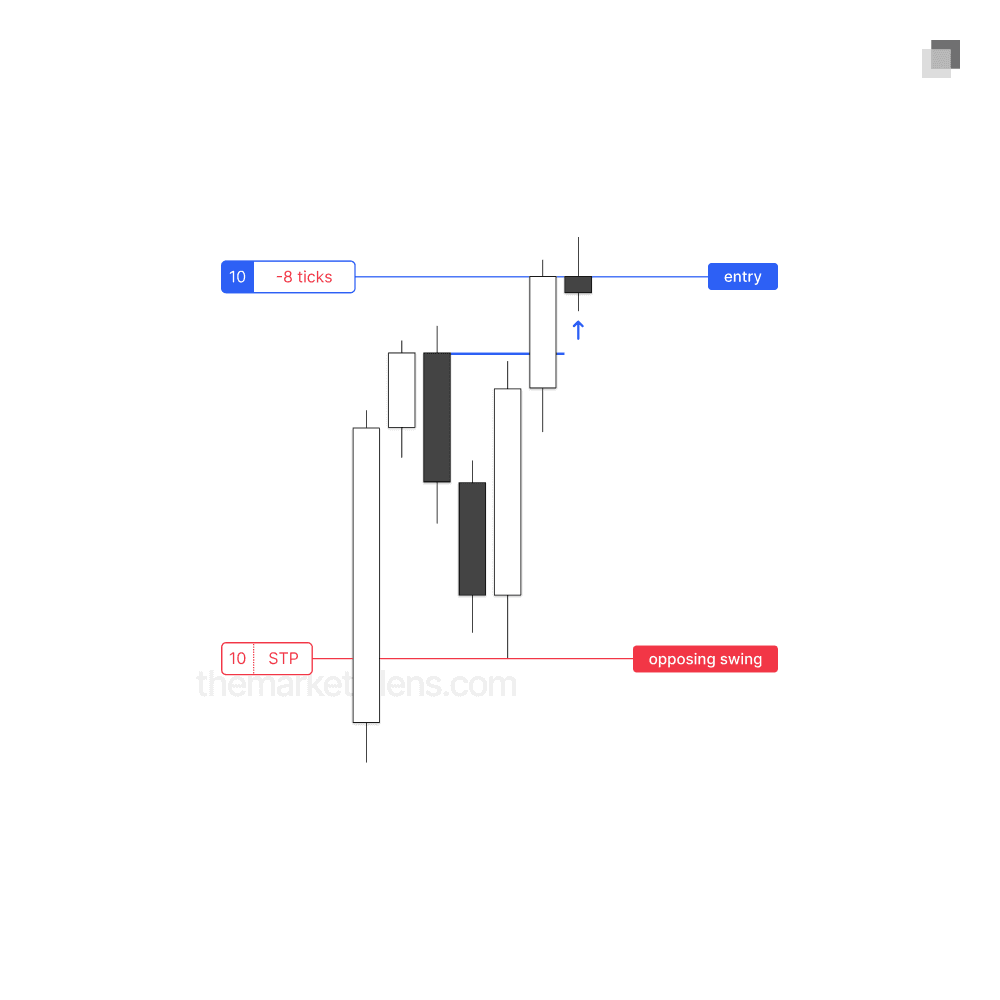
A swing invalidation means that the stop loss is placed at the true invalidation point of the trade, which is the protected swing.
A swing invalidation means that the stop loss is placed at the true invalidation point of the trade, which is the protected swing.
A swing invalidation means that the stop loss is placed at the true invalidation point of the trade, which is the protected swing.
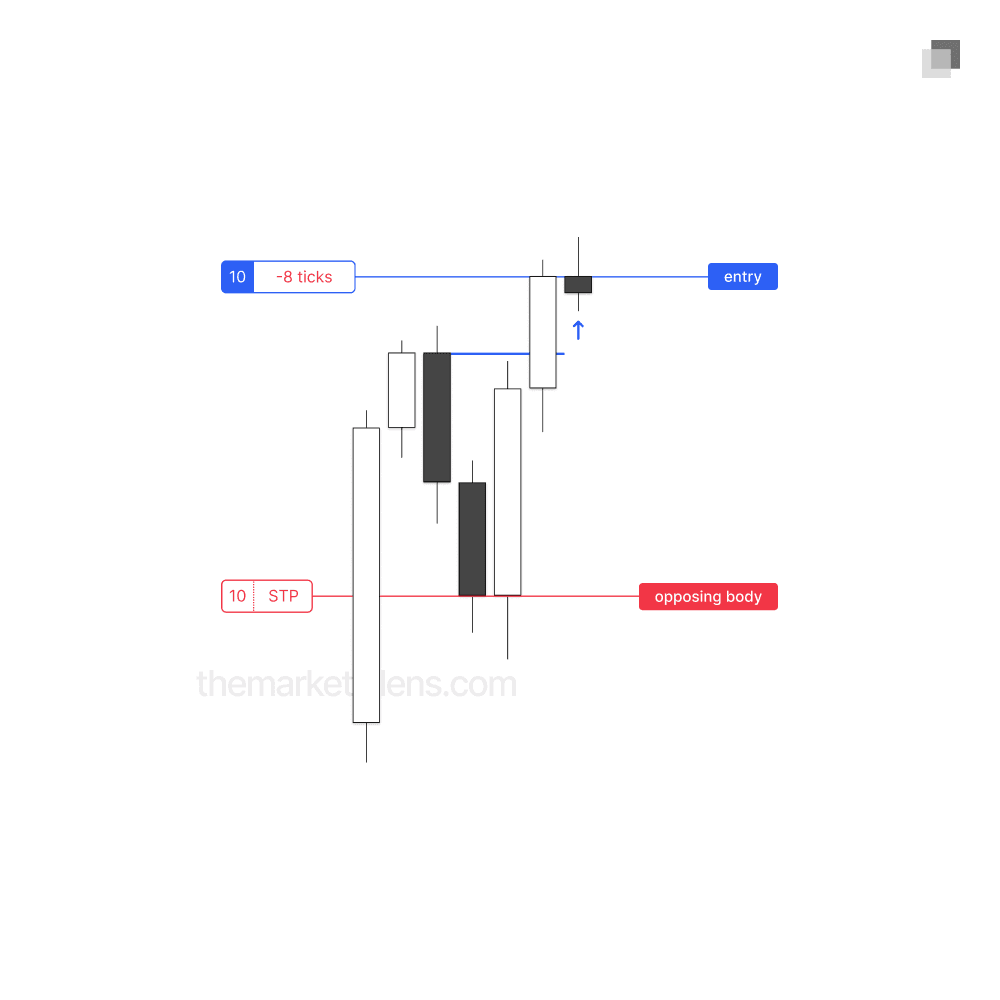
A body invalidation means that the stop loss is placed at the body of the protected swing. This placement increases the trade’s risk-reward ratio but carries the trade-off of not representing the true invalidation point.
A body invalidation means that the stop loss is placed at the body of the protected swing. This placement increases the trade’s risk-reward ratio but carries the trade-off of not representing the true invalidation point.
A body invalidation means that the stop loss is placed at the body of the protected swing. This placement increases the trade’s risk-reward ratio but carries the trade-off of not representing the true invalidation point.
Stop Loss Placement
Stop Loss Placement
Stop Loss Placement
As shown above, there are two options for placing the stop loss on a given position: at the body of the protected swing or at the swing point itself. The choice between these options depends on the trade context. To determine the most appropriate placement, first mark out the entire opposing run:
As shown above, there are two options for placing the stop loss on a given position: at the body of the protected swing or at the swing point itself. The choice between these options depends on the trade context. To determine the most appropriate placement, first mark out the entire opposing run:
As shown above, there are two options for placing the stop loss on a given position: at the body of the protected swing or at the swing point itself. The choice between these options depends on the trade context. To determine the most appropriate placement, first mark out the entire opposing run:
From high to low in a bearish scenario
From low to high in a bullish scenario
From high to low in a bearish scenario
From low to high in a bullish scenario
From high to low in a bearish scenario
From low to high in a bullish scenario
Then, measure 50% of this move. The stop loss should always be placed beyond this 50% point to provide sufficient room for price fluctuations while maintaining a structured risk approach.
Then, measure 50% of this move. The stop loss should always be placed beyond this 50% point to provide sufficient room for price fluctuations while maintaining a structured risk approach.
Then, measure 50% of this move. The stop loss should always be placed beyond this 50% point to provide sufficient room for price fluctuations while maintaining a structured risk approach.
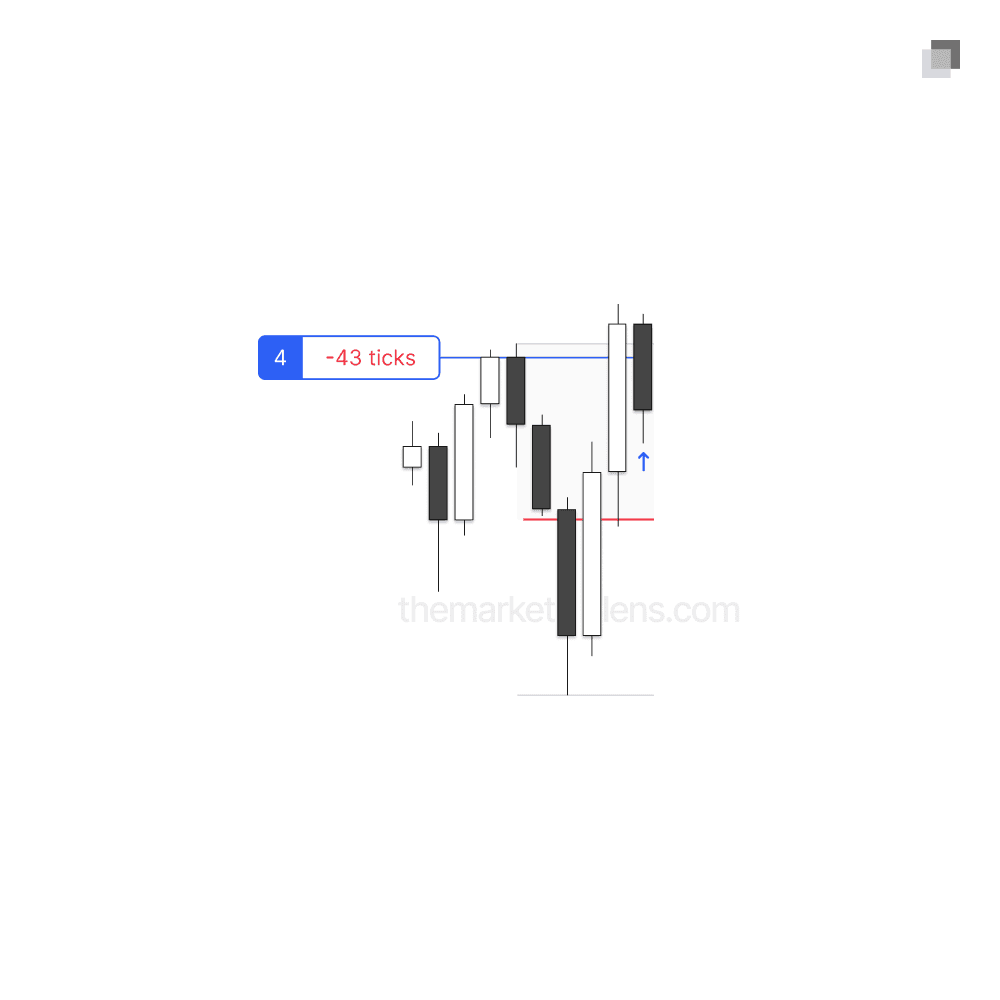
As shown below, there are two options for placing the stop loss on a given position: at the body of the protected swing or at the swing point itself. By marking out 50% of the opposing run, it is clear that both the body and swing stop loss placements are valid, as each lies beyond the 50% mark.
As shown below, there are two options for placing the stop loss on a given position: at the body of the protected swing or at the swing point itself. By marking out 50% of the opposing run, it is clear that both the body and swing stop loss placements are valid, as each lies beyond the 50% mark.
As shown below, there are two options for placing the stop loss on a given position: at the body of the protected swing or at the swing point itself. By marking out 50% of the opposing run, it is clear that both the body and swing stop loss placements are valid, as each lies beyond the 50% mark.

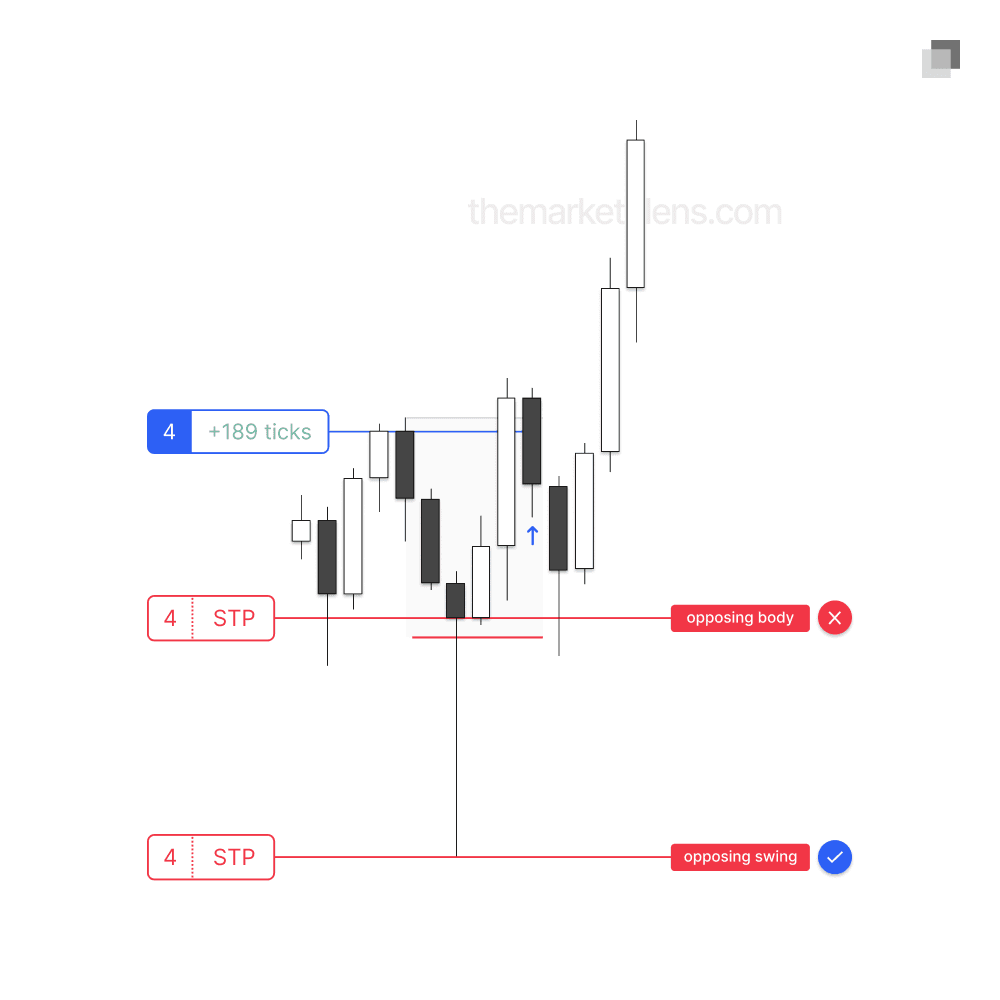
In the scenario below, there is a larger opposing run with smaller bodies. By marking out the opposing run and 50% of it, it becomes clear that placing the stop loss at the body does not extend beyond the 50% mark. This makes the body invalidation invalid in this case, requiring the use of the swing invalidation. If this placement does not provide sufficient risk-reward, it is advisable to wait for a continuation entry.
In the scenario below, there is a larger opposing run with smaller bodies. By marking out the opposing run and 50% of it, it becomes clear that placing the stop loss at the body does not extend beyond the 50% mark. This makes the body invalidation invalid in this case, requiring the use of the swing invalidation. If this placement does not provide sufficient risk-reward, it is advisable to wait for a continuation entry.
In the scenario below, there is a larger opposing run with smaller bodies. By marking out the opposing run and 50% of it, it becomes clear that placing the stop loss at the body does not extend beyond the 50% mark. This makes the body invalidation invalid in this case, requiring the use of the swing invalidation. If this placement does not provide sufficient risk-reward, it is advisable to wait for a continuation entry.
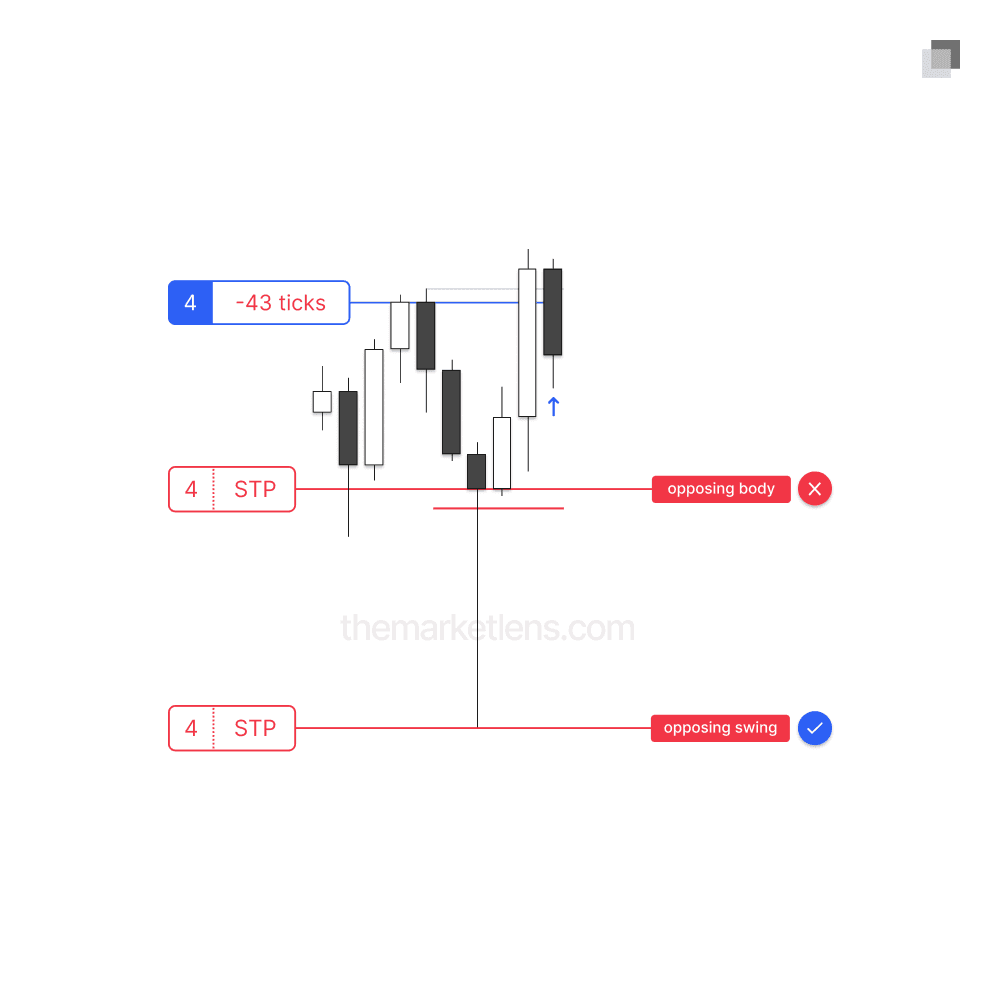
In this scenario, using the body invalidation would have resulted in a loss on a trade that ultimately turned out to be a winner, demonstrating the importance of using the swing invalidation in situations like this.
In this scenario, using the body invalidation would have resulted in a loss on a trade that ultimately turned out to be a winner, demonstrating the importance of using the swing invalidation in situations like this.
In this scenario, using the body invalidation would have resulted in a loss on a trade that ultimately turned out to be a winner, demonstrating the importance of using the swing invalidation in situations like this.

The standard for trading education and guidance
2026 The Market Lens - All Rights Reserved

The standard for trading education and guidance
2026 The Market Lens - All Rights Reserved

The standard for trading education and guidance


